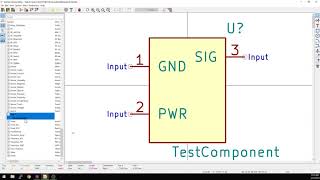
getting to blinky 5.0 - schematic symbol creation
Published 4 years ago • 17K plays • Length 15:20Download video MP4
Download video MP3
Similar videos
-
 13:55
13:55
getting to blinky 5.0 - making the schematic
-
 11:10
11:10
getting to blinky 5.0 - associating symbol and footprint
-
 5:38
5:38
getting to blinky 5.0 - introduction
-
 15:01
15:01
getting to blinky 5.0 - creating a custom footprint
-
 13:50
13:50
getting to blinky 4.0 - finishing the schematic
-
 25:29
25:29
getting to blinky 5.0 - finishing the layout
-
 45:42
45:42
rob schoelkopf – erasure detection and error correction in a microwave dual-rail encoding
-
 20:12
20:12
fixing machenike k500 keyboard (teardown & clean)
-
 6:21
6:21
how to check and test point circuit block alw - rt8206a/b 3v 5v alw, 3vo 5vo, 3vsus 5vsus, 5vao
-
 29:22
29:22
getting to blinky 4.0 - building blinky
-
 11:09
11:09
getting to blinky 4.0 - ordering parts
-
 14:02
14:02
kicad 3.0 - symbol creation with the component library - getting to blinky kicad tutorial - part 2
-
 19:47
19:47
getting to blinky 5.0 - output files for manufacturing
-
 4:55
4:55
introduction and kicad project creation - "getting to blinky" kicad tutorial - part 1
-
 4:19
4:19
kicad 5.0 - adding a new symbol library
-
 19:07
19:07
kicad 3.0 - creating footprints with the module editor - getting to blinky kicad tutorial - part 5
-
 7:36
7:36
kicad 3.0 - part association with cvpcb - getting to blinky kicad tutorial - part 4
-
 4:39
4:39
kicad 5.0 - copying symbols from one library to another
-
 6:30
6:30
kicad 3.0 - creating reusable paired schematic symbols in kicad (like in eagle)
-
 13:07
13:07
kicad 3.0 - schematic creation with eeschema - getting to blinky kicad tutorial - part 3