lrfd load combinations example 3 (v and m diagrams for a frame) part 1 of 2
Published 2 years ago • 142 plays • Length 14:29Download video MP4
Download video MP3
Similar videos
-
 16:45
16:45
lrfd load combinations example 3 (v and m diagrams for a frame) part 2 of 2
-
 17:18
17:18
lrfd load combinations example 2 (with v and m diagrams)
-
 12:11
12:11
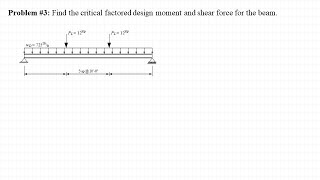
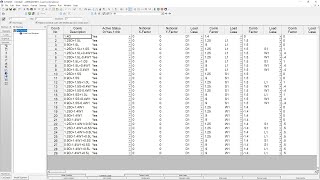
load combination example #3
-
 12:00
12:00
str04 x02-03x - load combination example #3
-
 11:58
11:58
str04 x02-03 - load combination example #3
-
 8:08
8:08
lrfd design method || example solved
-
 16:23
16:23
understanding shear force and bending moment diagrams
-
 20:18
20:18
drawing shear force and bending moment diagrams - example 6 with triangular load
-
 50:40
50:40
ce 414 lecture 02: lrfd and load combinations (2022.01.12)
-
 3:57
3:57
s-frame tutorial series #13 - creating load combinations
-
 2:31
2:31
distributed load in shear and bending moment diagrams in 2 minutes!
-
 0:57
0:57
kb 001763 | reducing the number of load combinations in rfem 6
-
 7:09
7:09
shear force and bending moment diagrams example #3: distributed load
-
 11:43
11:43
shear force and bending moment diagram practice problem #1
-
 8:11
8:11
to draw loading diagram and bending moment diagram from shear force diagram
-
 8:42
8:42
2 - example: calculating service and ultimate loads
-
 3:19
3:19
triangular distributed load in shear and bending moment diagrams in 3 minutes!
-
 51:35
51:35
ce 414 lecture 02: lrfd load combinations (2021.01.22)
-
 3:05
3:05
load combination example 1: dead and live load midspan moments | structural design & loading
-
 10:25
10:25
part 3 problem no. 3 on sfd and bmd - shear force and bending moment diagram - strength of materials
-
 16:30
16:30
shear and moment functions example 3: linear (triangular) decreasing load